How to Avoid Common Roof Repair Issues

A roof’s lifespan depends on the type of roofing materials and environmental factors. A properly maintained roof can last for many years before it needs repairs or a full replacement.

Roof Repair

Local repair options include replacing missing shingles, addressing leaks and applying elastomeric coatings. Improved drainage and regular maintenance can also reduce the need for repairs. Contact Roof Repair Columbus GA for professional help.

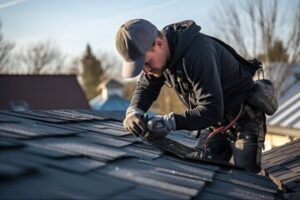
Without a doubt, damaged shingles are the most common roof repair issue. Shingles are highly durable and designed to withstand a lot of wear and tear, but high winds and falling debris can damage or loosen them up to the point where they need to be replaced.

Cracking, chipping or missing shingles should also be repaired as soon as possible to prevent water penetration and further damage to your home. Dark spots or streaks on shingle surfaces could indicate algae growth, which can also be detrimental to your roof over time.

While you’re at it, check that the flashing around chimneys, vents and skylights is intact and not compromised. This material seals the edges and joints of your roof to keep moisture out, so damage or looseness can quickly lead to leaks.

Assemble your roof repair tools, including a ladder, pry bar, hammer and utility knife. You’ll also need a bundle of replacement shingles that closely match your existing shingles. If you’ve got leftover shingles from previous roof work, that will be even better, but new shingles are easy to find at home improvement stores.

To replace a damaged shingle, start by sliding the new one into place. Line it up correctly and then secure it with roofing nails. Be sure to use a generous amount of roof cement over the seams and nail heads to seal in the shingle.

If a shingle is cracked, apply some roof sealant beneath the damaged section and then press a shingle strip into the crack. Spread the sealant evenly with a putty knife and then cover it with shingle granules to camouflage your repair.

Check the gutters for a buildup of colored shingle granules that can be collected and sprinkled over wet sealant to camouflage crack repairs. Make sure to inspect the entire roof for additional damage or leaking areas before calling in a professional roofer. Identifying and repairing issues like these early on can save you money in the long run by preventing further problems. A thorough roof inspection should be performed at least twice a year to catch potential problems before they get out of hand.

Leaks

A leaky roof can create serious and expensive problems. It’s important to know the warning signs of leaks, so you can catch them early and get your roof repaired.

Water stains on the ceiling or walls are often the first indication of a problem, though they’re not always easy to spot. You may also notice discolored patches in your attic or walls, a musty smell, or damp insulation. Moisture can also cause paint to bubble or wallpaper to peel, which are more obvious symptoms of a roof leak.

Leaks can be caused by many factors, including damaged asphalt shingles, poor flashing installation, or clogged gutters. If you’re not sure where the leak is coming from, it’s best to consult a professional roofer for advice.

The most common way to repair a leak is by covering the area with a tarp and using a heavy-duty sealant. This will prevent further water intrusion and minimize any interior damage. You should also take the opportunity to re-seal areas where necessary, such as around chimneys, vents, and skylights.

If you’re unsure where the leak is coming from, you can try to identify the source by testing your roof during rainy weather. While standing safely on the roof, use a garden hose to simulate rainfall. Start by spraying the area directly above where you suspect a leak is occurring. Then, direct the hose to the left and right to isolate the source of the leak.

If the leak is found, it’s time to fix it! Be sure to remove any debris and clean the area before starting work. If you’re tackling flat roof leak repair, it’s a good idea to wear rubber-soled footwear, safety goggles, and a harness with a fall arrest system to avoid injuries. Once the area is cleaned and dry, cover the leaky area with a tarp to prevent further damage. Then, use a high-quality roofing sealant to fix the hole and prevent future leaks. Be sure to test the area again after the sealant has had a chance to set. If you continue to experience leaks, consider a full roof replacement.

Gaps

Gaps between roof and gutter systems can negatively impact the structure of your home. Rainwater and snow melt should flow through the gutter channels and downspouts to prevent water from seeping under roof shingles, causing damage and rotting over time. The gap between roof and gutters can also allow moisture to seep into the siding or foundation of your house, leading to mold and structural damage. Fortunately, gaps between the gutter and roof can be fixed with proper maintenance and regular inspections.

One common gap that many homeowners are unaware of is a builder’s gap, which is created when the shingle decking does not align with the fascia board during construction. This gap is meant to improve attic ventilation, but it can also let water, insects, and other debris into your home.

Another potential source of gaps is the flashing that surrounds chimneys, vents, and skylights. This metal flashing seals the joints and edges on your roof to protect against leaks, but if the flashing is damaged or deteriorated, it can create a hole for water to enter your home. Inspect the flashing regularly, and replace it if necessary.

Other common gaps are caused by sagging or loose gutters, which can pull away from the roof edge and cause water to escape from the gutters. These gaps may also lead to landscaping erosion or water damage to the siding and foundation of your home. If you notice sagging or loose gutters, contact a professional gutter installation company to realign and repair them.

If you notice that your roof is leaking near vent areas, it’s likely a sign that the vent seals have deteriorated and need to be replaced. Using roofing cement or sealant can help to fill these gaps and ensure that the area is protected from rainwater and other elements. Also, make sure to periodically check that the vents are not blocked by debris or that they have not been covered by ice dams. This can help to prolong the lifespan of your roof and improve energy efficiency throughout your home.

Cracks

If a roof is well-maintained, it can help retain value and protect your home investment. Regular maintenance and inspections can detect problems that are easy to fix, such as cracked tiles or shingle cracks. However, cracks in your ceiling can indicate structural damage and other serious issues if left unchecked for too long. This is why it is important to identify and repair cracks in your home as soon as possible.

The presence of cracks in your ceiling can be a warning sign of structural damage, water leaks, and other issues with the structure of your home. Often, this damage can be caused by the weather and climate conditions in your area. However, cracks in the ceiling can also be caused by poor drywall installation or by age-related changes in the structure of your home.

If the cracks are only fine, hair-thin straight or spiderweb shaped and don’t show any signs of discoloration, they may be nothing to worry about. Plaster has a tendency to crack over time, and minor cracks in plaster ceilings are not uncommon. They typically don’t need to be repaired immediately, but if they are accompanied by sagging or discoloration, it’s a good idea to contact a roofing company for a professional assessment and repair.

Cracks that are yellow, brown or otherwise discolored usually indicate leaks and water damage. You can use roofing tape or sealant to temporarily stop the flow of water, but this is not a permanent solution. It’s best to have the cracks fixed by a professional, who can provide you with a durable and permanent repair.

Another cause of cracks in your roof is damage to the protective membranes that lie underneath the tiles. If these membranes become tattered, torn, or punctured, they can allow rainwater to penetrate the roof and cause damage to the insulation and other structures of your home.

The Importance of Roof Inspections

During a visual inspection, the inspector looks for leaks and structural concerns. Leaks manifest as water stains or musty odors, and wear and tear shows up as granule loss on asphalt shingles or splits in wood shingle roofs.

Roof Inspections

They also look for rust or cracked seals on flashing around penetrations like skylights and vent pipes. They also examine fascia boards and soffit materials for rot. Get professional help from Roofing Helena MT today.

Visual inspection is a key component of the broader field of Non-destructive Testing (NDT). The process involves carefully examining physical objects to detect defects, anomalies, and deviations from established quality standards. It plays a vital role in ensuring operational excellence, protecting consumer interests, and fortifying industrial integrity.

The benefits of visual inspection are many, ranging from increased efficiency and cost-effectiveness to the ability to identify a wide variety of defects and issues. Additionally, the inspection process is non-destructive and therefore can be performed on a broad range of materials. However, despite its many advantages, visual inspection is prone to inconsistencies and limitations.

A common challenge is subjectivity, which can skew results and reduce the effectiveness of the inspection process. This is especially true in complex environments where the location of defects may be difficult to discern. Additionally, visual inspections are typically limited to surface-level detection capabilities and cannot detect subsurface flaws or internal damage. Lastly, the accuracy of visual inspections can be affected by environmental conditions such as lighting, glare, or obstructed views.

To overcome these challenges, it is essential to establish a clear definition of defect criteria and standardize inspection performance. This helps to ensure that inspectors are consistently identifying deviations from established norms, and it also allows for comparison of inspection data over time. Additionally, it is important to use proper equipment and training to ensure that visual inspections are conducted safely and efficiently.

Fortunately, technology has paved the way for more efficient and accurate visual inspections. Specialized robots equipped with advanced imaging technologies can perform inspections in challenging, hazardous, or otherwise inaccessible areas. Remote Visual Inspection (RVI) tools, such as drones and robotic cameras, can also provide a detailed view of a location or facility from a safe distance, which is ideal for environments with potential risks to human safety.

When performing visual inspections, it is important to follow the appropriate safety protocols and follow all applicable regulations. This includes using protective gear, adhering to environmental guidelines, and ensuring that access equipment is properly maintained. It is also important to use a systematic approach to inspect all areas of interest and to document all findings accurately and thoroughly. In addition, it is important to communicate findings with relevant parties and propose improvement measures as needed. 

Ladder Inspection

Ladder inspection is a vitally important aspect of workplace health and safety. A faulty ladder can cause serious and life-changing injuries, so it’s essential that workers carry out detailed visual inspections before using a ladder. A worker who fails to inspect a ladder correctly could face significant fines or even prosecution. As such, it’s important to ensure that your employees are properly trained in how to conduct a ladder inspection and understand the requirements of ladder-specific standards and regulations.

A thorough inspection should include checking the ladder’s footings to make sure that they are stable and not loose or damaged, verifying that any spreader or locking devices are fully engaged and functional, examining the steps for signs of damage, and checking whether rung locks are present on extension ladders. It is also necessary to check that the ladder is in good condition and free of paint and other substances that could make it slip or become unstable.

The inspection process should be documented, and any issues identified should be reported to a supervisor for action. A good way to document the findings is to create a ladder inspection checklist that can be used by workers to help them identify any potential problems and take corrective actions before the problem becomes worse.

Detailed visual inspections of ladders should be carried out at regular intervals and recorded, and records should be available for review. The intervals can vary according to the manufacturer’s instructions, but a detailed visual inspection should be conducted before each use of a ladder. Ladders that are found to be faulty or damaged should not be used, and should be clearly marked as unfit for work and locked away.

Manual hazards remain one of the biggest causes of injury in the construction industry, and ladders are no exception. But with routine inspections, careful use, and following safety protocols, ladder-related accidents can be prevented. Our Ladder Inspection Training helps trainees develop a deeper understanding of how to effectively undertake ladder inspections, looks at the legal requirements and common faults that can lead to accidents, and covers the practical steps to taking action if a ladder is found to be unsafe.

Ground Inspection

Many homeowners overlook the importance of their roof, assuming that it’s “out of sight and out of mind.” However, your roof is one of the most important components of your home. It protects your family, possessions, and the rest of the structure of your home from moisture and other damaging elements.

If you’re thinking of selling your home or are simply maintaining it, a professional roof inspection can save you money in the long run by catching small problems before they become major issues. A certified inspector will use both a visual and on-the-ground inspection to find problems like leaks, standing water, mold and mildew, sagging, shingle damage, and more.

The inspector will walk across the surface of your roof to look for any areas that are loose, curled, or cracked. He or she will also check the condition of shingles and flashing. Shingles should be straight and flat against the roof, free of stains and moss, and free of missing or damaged granules. The inspector will also examine the underside of your roof, scanning rafters and joists for structural integrity.

Water damage can lead to rot and sagging, so the inspector will also look for any areas that are moist or dark. If the inspector finds any of these issues, he or she will recommend that you hire a contractor to do some roof repair before they get worse.

An inspector will also examine the gutters and soffit for signs of mold, rust, or rotting. The inspector will also look for vent pipes, skylights, chimneys, and other accessories. Finally, the inspector will take a sample of the shingle material for testing.

If the inspector finds that your roof is in good condition, he or she will provide you with a certificate that you can give to prospective buyers when you’re ready to sell your home. This will help you substantiate your claim that the roof is in good condition, which can increase the value of your home and speed up the sale process. In addition, a written certification from a certified inspector can help you qualify for special homeowner’s insurance rates and may be required by your mortgage company.

Attic Inspection

An attic inspection reveals information about your roof and the house as a whole. It also helps you fight high energy bills, mold and poor air quality. A home inspector will check the attic’s ventilation, insulation and structural integrity. The inspector will look for signs of leaks like water stains and wood rot.

An inspector will use a ladder or crawl space to access the attic. They will measure the depth of insulation to ensure it’s adequate. The inspector will also note any spots where more insulation is needed. They may also look for a soffit vent that could be blocked by debris or a clogged chimney flue.

If the attic has an unfinished area, the inspector will look for bare joists and sheathing. In Florida, it’s important that the attic framing is constructed well to support the heavy loads of a roof system. The attic will also reveal if the roof was installed correctly during construction. If a roof is damaged, it can leak and cause problems throughout the home.

The inspector will also note the condition of the attic vents and exhaust ducts, including whether there are any crisscrossing ducts that may interfere with proper ventilation. The attic should be insulated to prevent heat from escaping through the attic, causing the house to overheat.

Rodents, birds and other pests often nest in attics. They leave droppings and messes that must be addressed before they cause damage to the rest of the house. An attic inspection should be done every time you do a visual inspection, and every time there is a significant change in temperature. You can perform an attic inspection on your own, but it’s safer and more thorough to have a professional inspect the attic and the rest of the home.